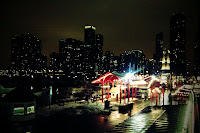
Downloaded FxCamera for our trip over to Chicago over the holiday weekend. The app has a mode called Toy camera, that produces a cross-processed look to the photographs in the phone itself. Unfortunately, the final images are resized, and applying an in-phone effect to a phone camera shot results in an irrecoverable loss of fidelity, leaving no room for anything else. According to the author, the effect is produced by manipulating the color curves of the image - something that GIMP does a rather good job of.
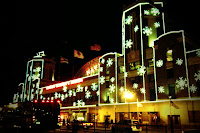
Cross-processing has its roots in film photography, where a film is deliberately developed in a chemical solution intended for a different film. Cross processing results in color casts, high contrast and a sort of blown highlights and color casts in blacks.
Cross-processing technique
To cross-process in GIMP, the idea is to open the picture; auto-correct the colors or get the picture to look well exposed; apply the curves; then potentially adjust contrast.
The focus of this post is the trickiest part step from the above - to apply custom curves for the cross-processed look. The screenshot below shows how the curves should look. Save these as a preset and use as a starting point. As you can see, the red highlights get toned down and shadows get stretched, the green highlights get stretched, and blue is clipped at the ends.

Redscale technique
Similar to the cross-processed technique is the redscale technique, that originated with film cameras using the film in reverse. This causes the photograph to have an overtly red cast, while suppressing greens and blues.
The curves similarly follow, by focusing on boosting the higlights and midtones of the reds, while actively damping greens and blues. The curves below are what work best when trying to apply the redscale technique in post processing.
The advantage of doing this outside the phone is of course the additional control, but in addition you can leave the poor phone camera to do what it can to get a decent photograph with its itsy bitsy sensor, without worrying about having to post process it as well.
 Of course, after using either technique, a good followup is to do a quick contrast boost make sure the resulting photograph is not too flat, and do the usual crop, resize, unsharp mask prior to saving as a png. Boosting contrast is achieved by using the classic "S-curve" on the composite channel. The curve can be stronger or flatter depending on the original photograph and the final desired effect. Know that you will lose a bit of detail at the higher and lower ends of the histogram using either technique and you shouldn't necessarily try to get it back with contrast correction.
External links: lilahpops.com & epicedits.com
1 comment:
Waterlogue is really great photo-editing apps and I would like to give it a try for editing some of my crucial photos. So thanks for having this chance to read about this article. Thanks
Post a Comment