May 16, 2011

GDesk on the Nokia 5800: more details

GDesk is a work in progress. This is painfully obvious when you begin trying to configure or edit the existing UI.

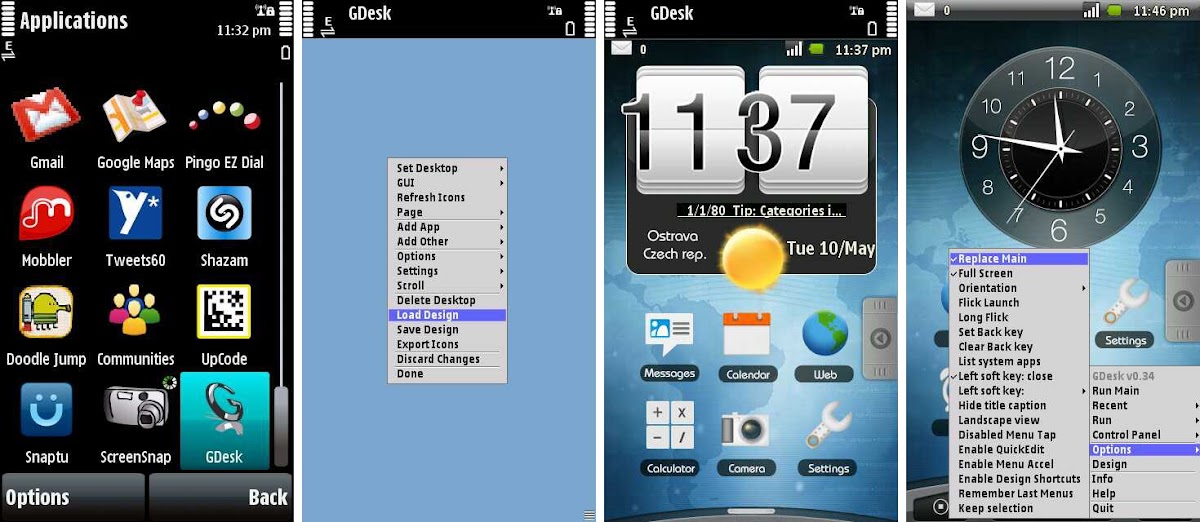
Toggling the "edit" mode happens via the Design menu item. Once you toggle the edit mode, you are now able to modify the content and placement of the various icons on the interface.

What you can do though is severely limited. The first, and most glaring problem is the lack of an undo option. This puts you in a strangely tentative mode while editing. To add to it, there is no easy way to manage the z-index. So if you have overlapping elements, it seems like what ends up on top is something you have no control over. A couple of slips of the stylus and the only option is to Discard Changes and start right over. Saving frequently is probably the only approach to successfully making big changes.

That said, there is still a lot you can do. You can set up icons and links, change their sizes and use many of the active elements supplied by GDesk.

Editing is not the only thing that is half-baked. After using the interface for a while, it feels like I am ready to get back to the original UI. There are several reasons for that.

  • First and most importantly, this is not a complete replacement of the UI. All applications still look exactly the same as under the original UI. This is merely an alternate home screen.
  • While on the subjects of home screens, GDesk does not really replace it. Instead, it is full screen program, configured to jump in everytime you go to the home screen.
  • Most elements on the UI are not configurable. It does seem to have a title-bar but no way to edit it's properties.
  • GDesk is limited in terms of how much you can talk to the underlying phone, and how much the phone can talk to you. Notification is the key gap here. Each notification capability needs to be programmed separately, and right now the only notifications programmed are the SMS and battery. This means you cannot see if you have missed calls, emails or other alerts.
  • The other capability I missed was the ability to choose the profile directly. This meant 5 or 6 taps to switch to and from silent; instead of the usual 2.

Overall GDesk is more a way to get some good eye candy and not really a replacement UI. But again, this was little more than a beta, and something Nokia never thought to run with.

May 15, 2011

Capture Camera Clip: on Kickstarter

I guess I joined the bandwagon. After all the case is so compelling. The video above is a great introduction.

tl;ds

The Capture Camera Clip System is a machined doodad that grabs onto belts and backpack straps that allows cameras to be clipped onto it. Using the tripod mount, the clip looks and sounds like a solution that can finally take on the problem of the swinging, dangling SLR.

This, also was my first attempt at backing something on the site Kickstarter. If you have not heard of the site yet, it is a creative way to fund projects. Everyone gets to be a venture capitalist, for a fixed reward of course, and not a direct equity stake. Nevertheless it has spawned several awesome projects including the TikTok+LunaTik Multi-Touch Watch Kit, Diaspora and GoPano, in addition to a ton of movies and documentaries.

May 14, 2011

Swapping the battery on an iAudio X5

The iAudio X5 running a Rockbox build has been my default music player practically forever. Even after a forgetful incident while deplaning a Lufthansa flight caused me to lose my first purchase of the X5L, my replacement was a 60 gig X5. It is bulky, clunky and rather plain but has everything else I needed in my player. Great hardware, FM radio, Aluminium chassis (survived two falls), good battery-life, wonderful sound and finally hackable hardware.

When it's battery finally started to give way, the portable player became a PMP at home, and when the input voltage fell to 1.8v it was time to change the battery. Thanks to this thread, I had enough of a peek into the internals of the player and the name of a replacement battery. RadioShack has the Dantona 3.7V/1100mAh Li-ion PDA Battery for Cowon/iAudio (Model: PDA-203LI | Catalog #: 55027810) available online for $25. If you find a local store that does "Ship to Store" you could get it delivered for free. This replacement has slightly lower capacity than the original, but there hasn't been much success in finding a battery with higher capacity that fits.

Dis Assembled

Replacing the battery is not that difficult. My only hesitation in starting with it was that I did not have a solder iron. And I was not going to buy an iron plus lead for what could be just two joins. I figured I could do a quick and dirty splice instead. The detailed steps are given below, with the numbers in the text referring to the numbers on the image.

You need a couple of small screwdrivers [1], one with a flat and the other with a Phillips head. I used a set that came as part of a spectacles repair kit. You also need to get the batteries [2] before you begin.

To get the back of the player [3] off, using the Phillips driver to unscrew the four screws holding it on. The first thing you will see is the hard-disk [4] and a tape holding it down along the top. There are also a couple of wires running down the sides as well. Carefully separate the wires, undo the tape and flick the top of the hard-disk to get it off. The hard-disk is connected to the body via a cable, which you should try your best to never damage.

Some versions, have a rubber cushion [5] between the hard-disk and the battery, use your flat screwdriver to gently ease it out. This will expose the battery [6] allowing you to pull it out and show the two wires connecting it to the circuit board.

Because I was not going to solder the battery on, the other approach was to cut the existing battery, stripping away the insulation for both the existing wires and the new battery and splicing them together. Which was when I realized I did not even have a decent insulation tape, so regular tape had to do instead.

Couple of tips. The wires are multi-strand. This is both good and back. Good, because it makes splicing that much easier. Bad because any weakness you introduce while stripping the insulation may cause the strands to break and short the board itself. Make sure you blow the board clean before re-assembly.

That is it. Repeat the steps in reverse to put everything together. In my case this left me with a player that is once again portable. And it still as great a media player.

May 13, 2011

GDesk to skin Nokia 5800

For all it's hardware prowess, and flexibility, the Nokia 5800's interface is little more than a hastily put together extension of the S60 3rd edition interface that runs on top of the Symbian OS. This makes the touch interface more of an after-thought, but importantly carries over several elements that were more suited for keyboard interaction than touch. Nokia never got around to fixing this gap, before it's well publicized surrender to Apple & Android by choosing to go with Microsoft's Windows Mobile OS.

Luckily there were several other attempts to make up for Nokia's nearsightedness.

One such attempt was GDesk, written first for S60 3rd edition, and subsequently ported to the 5th edition. GDesk is a flexible, extensible desktop framework, that has the capability to build entirely new UI from scratch.

Inexplicably, or perhaps explained now in hindsight, Nokia did not jump on projects like this and try to integrate into their own interface efforts. There also has been limited development of GDesk in about 2 years. That however, did not stop folks from creating multiple themes and skins that can be used to create pretend interfaces.

Installing GDesk

Installing GDesk is pretty straightforward. The full package consists of the main GDesk .sis file, along with six other "plugins", giving you a total of seven installable files. The trickiest part is finding signed installable files so that you can install them on the Nokia 5800.

  • Search for "gdesk 0.34 signed" and you should be able to find a copy that works
  • Create a folder on your memory card, and copy all seven .sis files over
  • Use the File Manager on the phone to locate the GDesk installer first and tap to install it, as shown above.
  • Repeat with the rest of the plugins, and you are all ready to go.

Running GDesk

GDesk shows up as a regular application, double tap to run it. When it first runs, it is little more than an empty "desktop" with no distinguishing features at all. What you need is a GDesk desktop file, that contains a particular configuration. These are available as .gdd files.

  • Google around for good desktop file. I got mine from here. It emulates HTC's interface. Download it and store it on your memory card.
  • Tap anywhere on the desktop and select "Design". This switches GDesk into an editable mode.
  • Tap anywhere on the screen again and select "Load Design". Browse to wherever you stored the .gdd file and hit Select.
  • Wait, watch and enjoy.
  • There are two settings that are not checked by default, that you may want to make sure to enable: Tap > Options > Full Screen and Tap > Options > Replace Main. The first one makes it full screen, and the second one allows GDesk to replace the main menu.

GDesk: A Preview

The first feeling after installing GDesk and running the HTC UI is frankly euphoric. The graphics are clean and vibrant, thanks to the 5800's beautiful screen. There are five screens that you can swipe to traverse. But very soon the lack of depth of the implementation comes through. But more on that in a later post.

To be clear, GDesk is by no means a full fledged user interface. When you run any application, what you see is the default 5th edition navigation buttons. However, when you get to the home screen, GDesk appears, overriding the default (after a perceptible delay).

All said, this is a surprisingly powerful way to create a new home screen for the 5800. Next post to be about what works and what doesn't along with my first attempt at modifying the UI.

While it goes without saying, you could brick your phone if you do not take care. And everything on this post is provided with absolutely no warranty.

May 01, 2011

1 Gpbs Bandwidth (infographic)

Infographics was a way was for me to tackle and (try to) express uncommon news and large numbers. One such opportunity came along when I heard of the Gigabit per second experiment that Google was planning. I had followed with amusement as cities did everything that they could to woo Google.

But the Gigabit per second is a truly revolutionary concept, for which there are no known applications at the moment. Yes, there are ideas - but in the classic chicken-and-egg style - nothing has materialized.

The problem with solutions that come in search for problems is this - they could either herald the next big thing. Or they could just be the beginnings of a bubble, that was driven more by a vague promise than hard reality.

This was my attempt at putting down on paper, why the 1 Gpbs is a lot of bandwidth. And this is also the first infographic that uses layers in Inkscape.