For all it's hardware prowess, and flexibility, the Nokia 5800's interface is little more than a hastily put together extension of the S60 3rd edition interface that runs on top of the Symbian OS. This makes the touch interface more of an after-thought, but importantly carries over several elements that were more suited for keyboard interaction than touch. Nokia never got around to fixing this gap, before it's well publicized surrender to Apple & Android by choosing to go with Microsoft's Windows Mobile OS.
Luckily there were several other attempts to make up for Nokia's nearsightedness.
One such attempt was GDesk, written first for S60 3rd edition, and subsequently ported to the 5th edition. GDesk is a flexible, extensible desktop framework, that has the capability to build entirely new UI from scratch.
Inexplicably, or perhaps explained now in hindsight, Nokia did not jump on projects like this and try to integrate into their own interface efforts. There also has been limited development of GDesk in about 2 years. That however, did not stop folks from creating multiple themes and skins that can be used to create pretend interfaces.
Installing GDesk
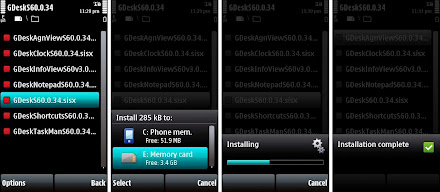
Installing GDesk is pretty straightforward. The full package consists of the main GDesk .sis file, along with six other "plugins", giving you a total of seven installable files. The trickiest part is finding signed installable files so that you can install them on the Nokia 5800.
- Search for "gdesk 0.34 signed" and you should be able to find a copy that works
- Create a folder on your memory card, and copy all seven .sis files over
- Use the File Manager on the phone to locate the GDesk installer first and tap to install it, as shown above.
- Repeat with the rest of the plugins, and you are all ready to go.
Running GDesk

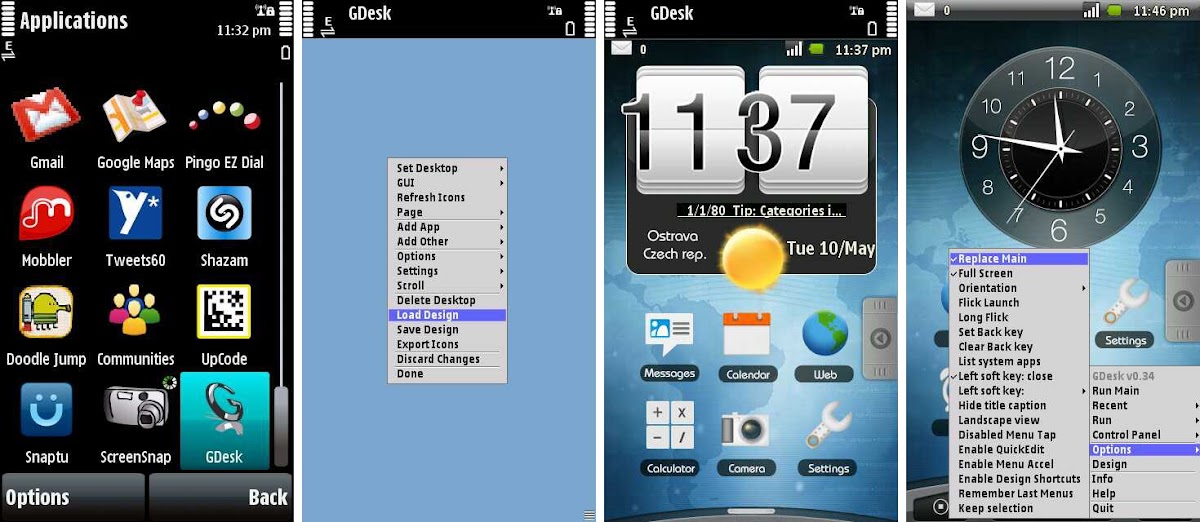
GDesk shows up as a regular application, double tap to run it. When it first runs, it is little more than an empty "desktop" with no distinguishing features at all. What you need is a GDesk desktop file, that contains a particular configuration. These are available as .gdd files.
- Google around for good desktop file. I got mine from here. It emulates HTC's interface. Download it and store it on your memory card.
- Tap anywhere on the desktop and select "Design". This switches GDesk into an editable mode.
- Tap anywhere on the screen again and select "Load Design". Browse to wherever you stored the .gdd file and hit Select.
- Wait, watch and enjoy.
- There are two settings that are not checked by default, that you may want to make sure to enable: Tap > Options > Full Screen and Tap > Options > Replace Main. The first one makes it full screen, and the second one allows GDesk to replace the main menu.
GDesk: A Preview

The first feeling after installing GDesk and running the HTC UI is frankly euphoric. The graphics are clean and vibrant, thanks to the 5800's beautiful screen. There are five screens that you can swipe to traverse. But very soon the lack of depth of the implementation comes through. But more on that in a later post.
To be clear, GDesk is by no means a full fledged user interface. When you run any application, what you see is the default 5th edition navigation buttons. However, when you get to the home screen, GDesk appears, overriding the default (after a perceptible delay).
All said, this is a surprisingly powerful way to create a new home screen for the 5800. Next post to be about what works and what doesn't along with my first attempt at modifying the UI.
While it goes without saying, you could brick your phone if you do not take care. And everything on this post is provided with absolutely no warranty.
No comments:
Post a Comment